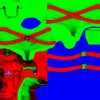
A tip when you're adding details to your custom textures: if you want such details to look engraved/embossed into the cloth, you'll have to add them on the displacement/bump map as well. These maps have a _n_ in their names (like in cf_lp35i_lbdy_f_strapslegs_n.tga). Don't worry, they're unpacked by default so it's easy to locate them. They are greenish/reddish, pretty ugly to look at when you open them.
Now, I'll assume you're working with layers when editing your textures. Once you're done with your diffuse/color map, save it and convert it to .dds as per tutorial but don't flatten your image or discard any layer yet. Open the displacement map, you'll notice their size is different. Write down the displacement map's size and apply it to the diffuse map (uncheck constraint proportions or any similar function; enter it manually). Select the layers containing the added details and duplicate them to the displacement map. 9 times out of 10, the copied layers will be right where they need to be; desaturate the new layers and you're done. You can now save it as .dds and the DOS utility will repack it.
Note: remember to return the diffuse map to its original size, otherwise SRIV will start to act up and you'll get frozen menus, missing clothes, etc. Or, just don't save after converting it to .dds.
I have attached two files as examples: the first one is the Apocalypse Pants' diffuse map, it has a fleur de lis on the holster, the second is its bump map with the same symbol.
Hope somebody will find it useful.
I use Photoshop but GIMP will do the trick (just don't ask me about it, I find GIMP's UI messy as hell ).
).
Now, I'll assume you're working with layers when editing your textures. Once you're done with your diffuse/color map, save it and convert it to .dds as per tutorial but don't flatten your image or discard any layer yet. Open the displacement map, you'll notice their size is different. Write down the displacement map's size and apply it to the diffuse map (uncheck constraint proportions or any similar function; enter it manually). Select the layers containing the added details and duplicate them to the displacement map. 9 times out of 10, the copied layers will be right where they need to be; desaturate the new layers and you're done. You can now save it as .dds and the DOS utility will repack it.
Note: remember to return the diffuse map to its original size, otherwise SRIV will start to act up and you'll get frozen menus, missing clothes, etc. Or, just don't save after converting it to .dds.
I have attached two files as examples: the first one is the Apocalypse Pants' diffuse map, it has a fleur de lis on the holster, the second is its bump map with the same symbol.
Hope somebody will find it useful.
I use Photoshop but GIMP will do the trick (just don't ask me about it, I find GIMP's UI messy as hell
 ).
).Attachments
Last edited:


