Saints Row 3\4\Remastered mesh import addon for Blender

Putting the textures in the same folder fixed it, thanks! As far as I can tell, the converter no longer gives me any errors when it comes to the mesh. However, when updating the "dlc1_customize_item.asm_pc" file, it says it's unable to find both the "gpeg_pc" and the "cpeg_pc" files, even though they're there in the folder.
In which folder? You should repack them along with mesh\rig\morph files in custmesh_xxx.str2_pc file from which you have extracted them. And make sure that all the file names match before you repack an .str2_pc file. If original cpeg\gpeg were called cm_dlc_bla_bla_bla.cpeg and cm_dlc_bla_bla_bla.gpeg, then make sure that's what your packed textures are called as well. Same with mesh files.
But I've been re-reading the tutorial about adding items with physics into the game (found here: https://www.saintsrowmods.com/forum/threads/customization-items-with-physics.17290/ ) and I'm not sure if what I'm trying is even possible.
I mean, your model is already rigged, you don't need to modify .rig_pc and .sim_pc files it comes with.
 
In which folder? You should repack them along with mesh\rig\morph files in custmesh_xxx.str2_pc file from which you have extracted them. And make sure that all the file names match before you repack an .str2_pc file. If original cpeg\gpeg were called cm_dlc_bla_bla_bla.cpeg and cm_dlc_bla_bla_bla.gpeg, then make sure that's what your packed textures are called as well. Same with mesh files.

I mean, your model is already rigged, you don't need to modify .rig_pc and .sim_pc files it comes with.
I found out what caused the error, the converter was automatically renaming the cpeg and gpeg, it changed the "cm" to "cf" in their names, undoing this fixes it. That being said, the results in-game are still the same, even if the converter doesn't show any errors anymore, even after renaming the textures and re-exporting the mesh in blender.

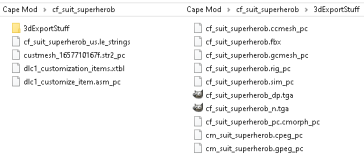
I don't understand why it's not working, but here's what my folders look like anyway:

Edit: I've also tried to name the cpeg/gpeg "cf_blabla" instead of "cm_blabla" and only change it later when it's time to package the "str2_pc"/"asm" file (or else it gives me the same error) but that also didn't help, the game still crashes even though the converter doesn't show any errors. Perhaps I should use the cloning tool to clone an item first, instead of trying to edit the Miss Mischief suit itself.
 

Attachments

  • FolderStructure.png
    FolderStructure.png
    18.5 KB · Views: 43
Last edited:
This is fantastic! I've picking through the various clothing items, thinking of modifications I might make to them (rolled up, shortened, or removed sleeves for example), or ways to mix and match different pieces. Or suits I wanted to split into pieces. Which is where I ran into a problem: I wanted to split up the Bloody Canoness suit (hat, glasses, upper, lower, and the overcoat in the backpack slot), but none of the body blendshapes were imported. Other outfit options I've tested came in with the right blendshapes (usually with proper blendshape labels, but not always). I even testing similar suits, like Spanked from ETD, and those didn't have any problems. So it seems to be specific to the Canoness suit in particular.
 
Probably someone asked this, but in any case.. there's a way to create an export for mesh?
You have to use SRIV SDK for that.
This is fantastic! I've picking through the various clothing items, thinking of modifications I might make to them (rolled up, shortened, or removed sleeves for example), or ways to mix and match different pieces. Or suits I wanted to split into pieces. Which is where I ran into a problem: I wanted to split up the Bloody Canoness suit (hat, glasses, upper, lower, and the overcoat in the backpack slot), but none of the body blendshapes were imported. Other outfit options I've tested came in with the right blendshapes (usually with proper blendshape labels, but not always). I even testing similar suits, like Spanked from ETD, and those didn't have any problems. So it seems to be specific to the Canoness suit in particular.
Maybe you are importing the wrong file? There could be a separate version of the outfit meant specifically for Viola.
 
You have to use SRIV SDK for that.

Maybe you are importing the wrong file? There could be a separate version of the outfit meant specifically for Viola.
I considered that possibility, but even the reference document (yours included -- which thanks for them) for ccmeshes has the one I imported listed as the correct suit (in fact, the ref doc for SR3 and SR4 both have the same mesh ID number ccmesh file name). Just to be sure, I tested cf_dlc_bc_suit_f_suit.ccmesh_pc again just now, and it came back the exact same way -- there are only 2 'active' body shape keys. The other active shape keys are for the head and face. The rest of them are 'empty' and have no vertex morphing data. The two active body keys only 'stretch' the mesh (one vertically, the other laterally). Maybe it's because the suit is actually used for both the player and Viola, and it has some additional special shapekeys to 'fit' the mesh to Viola and the player? Though, that doesn't make much sense, since the male version of the Bloody Canoness suit has the same deal. Unless they directly converted the female version to the male version, and kept the offending shapekeys?
 
Last edited:
I tried importing the file, and body morphs appear to be present, but vertices displacement values end up being way smaller than they are supposed to be. Their names are 11747976445, 10376580711, 10789694290, 8986995655. Don't know why the script isn't working properly with this particular model, but in the meantime, you can paste the script below into Blender's text editor, select all the mesh objects and run it. It will "amplify" body morphs, and then you can try to manually pick shape key values that would match morphs of the body mesh.
Python:
import bpy

names = {
    11747976445: "bodyMale",
    10376580711: "bodySkinny",
    10789694290: "bodyFat",
    8986995655: "bodyMuscular"
}

for o in bpy.context.selected_objects:
    for sk in o.data.shape_keys.key_blocks:
        try:
            sName = names.get( int(sk.name) )
        except: continue
        if (sName == None): continue
        sk.name = sName
        for i, v in enumerate(sk.data):
            d = v.co - o.data.vertices[i].co
            d *= 1000.0
            v.co = o.data.vertices[i].co + d
 
Ahh! So the body shapekeys are all present; it's just that the vertices are adjusted by an imperceptible amount for some of them. That's interesting. But sadly, after testing the fix, the problems with them are more substantial than simply scaling up the shakekey strength. When active, none of adjusted shapekeys properly match the base mesh. Also, the strength of the modified shapekeys were off the charts (0.014 was about as high as needed). Granted, I can just create a new shapekey mix, so it's hardly an issue. On a whim, I also tried setting the original shapekey maximums to 10. That was enough to create the same effect for the body_fat_plus shapekey, but not enough for the others. I'm guessing that's why you've got a 1000x multiplier, but since Blender caps shapekey maximums at 10, I couldn't go any higher than that to see what the other shapekeys required.

Needless to say, splitting this particular suit up into separate parts will be far more involved than I anticipated. The shrinkwrap and surface* deform modifiers, using the base meshes as the targets, produced better results, so that may end up being what I'll have to use to build new body shapekeys.
 
Last edited:
Needless to say, splitting this particular suit up into separate parts will be far more involved than I anticipated. The shrinkwrap and surface* deform modifiers, using the base meshes as the targets, produced better results, so that may end up being what I'll have to use to build new body shapekeys.
I suggest giving a try to MeshDataTransfer addon. It's very useful for quickly "copying" shape keys from one object to another. It does great when a piece of clothing is skin tight or at least roughly form fitting. Capes or skirts and such would probably need extra work, but it's still definitely easier than making shape keys from scratch or using shrinkwrap.
 
I suggest giving a try to MeshDataTransfer addon. It's very useful for quickly "copying" shape keys from one object to another. It does great when a piece of clothing is skin tight or at least roughly form fitting. Capes or skirts and such would probably need extra work, but it's still definitely easier than making shape keys from scratch or using shrinkwrap.
Oh, no, no. Not from scratch. That's way more work than I'd be willing to do. Form fitting clothing can be done easily enough with shrink wrap, especially if they have nearly identical mesh topology. I've used that for things like socks without issue. For clothing that doesn't fit as tightly to the body (like the long jacket), the surface deform modifier can be used to 'mimic' the shapekey of the base mesh, by binding the clothing mesh's 'shape' to the shape of the base mesh,. When a base mesh's shapekey is turned up, the clothing item deforms along with it (sort of like a mesh-based lattice modifier). It's not perfect, but it appeared to get me ~95% of the way there. Once I apply the modifier as a shapekey, I'd just need to tweak the vertices that pinch together and what not. And since the basemesh's contain a shapekey for the opposite gender (with some repositioning required), it's pretty quick to then convert clothing for one gender into clothing for the other.

Obviously, trial and error is ahead, I'm sure....wonder if I'll need to resim the longer coat part, or if I can copy the current coat sim file and reuse it?
 
Back
Top